

When shooting landscape images, the contrast in light between land and sky can be too great for your camera’s dynamic range – resulting in poorly exposed photographs. The only in-camera solution is filtration and in this article we will show you how Neutral Density filters can be used not only for correction, but for creativity too.
Graduated Neutral Density filters:
One of the biggest challenges landscape photographers face is that the sky is often much lighter than the landscape below. The difference in brightness can be equivalent to several stops and the level of contrast can extend beyond the sensor’s dynamic range. Consequently, if you meter correctly for the sky, the foreground will be too dark; but if you meter for the land, the sky will be overexposed and highlights washed out. The most effective and best solution is to use camera lens filters to ensure the best image at the time of capture. Filtration is the only in-camera method of balancing the light in unevenly lit scenes.
Graduated ND filters are half clear, half coated; with a transitional zone where they meet. By aligning the transitional zone with the horizon, only the sky is affected by the filter’s ND coating. Doing so allows photographers to ‘hold back’ the sky in order to balance the contrast in light between sky and foreground. By using a ‘grad’, it is possible to bring the entire scene within the sensor’s dynamic range – ensuring detail is retained in both shadow and highlight areas.
Grads are brilliantly simple to use. First attach a filter holder – Cokin, Hitech and Lee Filters are among the leading brands of filter systems. Next, slide the filter in from the top and then – while looking through the viewfinder or via LiveView – align the filter’s transitional area with the horizon.
-

- Without ND graduated filter

-

- With ND graduated filter

The contrast in light between the sky and land is often at its greatest at dawn and dusk, and it can extend beyond the camera’s usable dynamic range. If you meter correctly for the land, the sky will be overexposed – as in this example. However, by attaching a graduated ND filter, it is possible to balance the light and record detail throughout the scene.
The strength of ND grad you require depends on the lighting and, to some degree, the effect you desire. They are most commonly available in 1-, 2- and 3-stop densities. To work out which density you require for any given situation, simply take a spot meter reading from the sky, one from the foreground, and then calculate the difference in stops between the two (a ‘stop’ is a halving or doubling of an exposure value). For example, lets say your meter reading from the sky is 1/500sec and the one from the land is 1/15sec – the difference in light is approx. 5-stops. However, we expect the sky to look brighter than the land, so don’t even out the light completely by attaching the equivalent value in graduated filters. Instead, it is normally best to retain a 2- or 3-stop difference between sky and land – therefore, in this instance a 2- or 3-stop ND grad would suffice.
The majority of landscape photographers rely on ND grads for their photography. The alternative is to take two or more differently exposed images of the same scene and later merge them together using photo editing software. However, this technique involves more time spent on a computer. For those who prefer to get things right ‘in-camera’, ND grads are the best option.
Screw-in, circular versions are produced by some brands, but are not recommended. Once screwed onto the lens, the position of their transitional zone is effectively ‘fixed’, dictating where you place the horizon in your photo and limited your choice of composition. Slot-in versions are rectangular in design and can be slid up and down in the holder so that the photographer can position the graduated zone precisely, depending on where the horizon is positioned in your photo.
Accurate placement of the grad is important. If you inadvertently push the filter too far down in the holder, the foreground will be artificially darkened by the filter’s coating. Equally, if you don’t slide the filter down far enough, you will create a noticeable bright ‘band’ close to the horizon where the sky remains unfiltered. However, correctly positioning the filter is normally straightforward and, with just a little practise, an easy and intuitive thing to do.
Soft- or hard-edged?
Graduated ND filters are available in two types – hard- and soft-edged. ‘Soft’ ND filters are designed with a feathered edge, providing a gentle transition from the coated portion of the filter to the clear zone; while a ‘hard’ ND is designed with a more sudden transition. Both types are useful, depending on the scene.
Soft grads are better suited to shooting landscapes with broken horizons, as they don’t noticeably or abruptly darken objects breaking the skyline – like buildings, mountains or trees. However, on the downside, only around a third of the filter is coated with its full density before it begins to fade to transparent. This can be a problem, as usually the brightest part of the sky will be just above the horizon where a soft grad is at its weakest. As a result, to avoid this strip of horizon from overexposing, it may be necessary to align the filter lower in the holder so that it overlaps the ground, which isn’t ideal.
In contrast, ‘hard’ grads are designed so the full strength of their specified density is spread over a greater proportion of the coated area. They can be aligned with far more precision and allow photographers to reduce the brightness of the sky with greater accuracy than a soft grad. On the downside, they are far less forgiving should you position the filter incorrectly.
-

- Soft set

-

- Hard set

Hard or soft?
Although ‘soft’ grads are more forgiving if misplaced, they are also less effective, with only a third of the filter coated with the full density before it fades to transparent. Hard grads are easier to align and are generally more useful, particularly when shooting a landscape with a straight, uninterrupted horizon.
Solid Neutral Density filters:
Solid ND filters are one of the most useful and creative filter types. They are designed to absorb light in order to artificially lengthen shutter speeds. In doing so, photographers are able to intentionally blur subject motion and imply a feeling of motion.
They are produced in a range of densities and are available as both slot-in and screw-in types. The darker they are, the greater their density and therefore, the more light they absorb. Their density is normally indicated on the filter – or mount, if it is a screw-in type. Confusingly, filter brands indicate the density of their filters using different methods. For example, a density of .1 represents a light loss of 1/3 of a stop. Therefore, a .3 ND is 1-stop; .6 is 2-stops; and .9 is a 3-stop density. Alternatively, some brands mark their filters with their ‘filter factor’, with 2x being equivalent to 1-stop; 4x 2-stops and 8x being a 3-stop density.
Higher density filters generate longer exposures and a more pronounced effect on subject movement. For example, if the camera’s original recommended shutter speed is, say, 1/4sec, exposure time will be lengthened to 1/2second, using a 1-stop neutral density filter; 1-second, using a 2-stop ND filter; or 2-seconds by attaching a filter with a density equivalent to 3-stops. This represents a significant shift in exposure, with the potential to greatly alter the look and feel of the final shot. ND filters with even higher densities are also available, capable of more extreme effects.
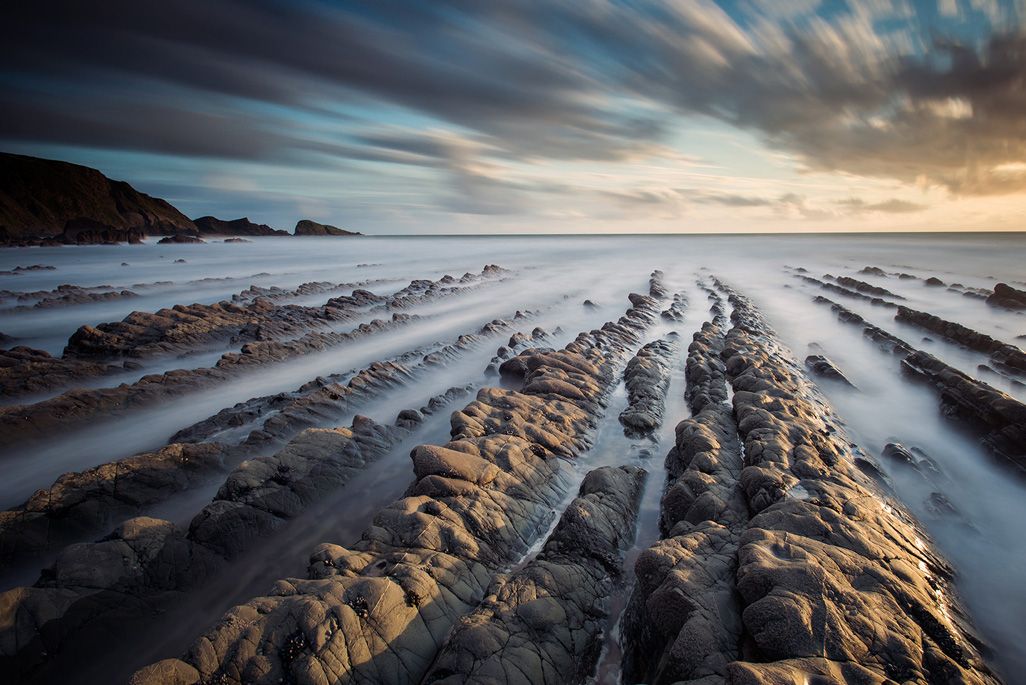
-

- Water motion: Solid ND’s are an essential creative tool, allowing photographers to intentionally blur subject motion. Using a 3-stop ND filter helped generate a 30-second exposure, recording the water flow as an ethereal, milky blur.

-

- Swaying crops: ND filters aren’t just useful for blurring water motion, but for any moving element within the landscape – including clouds, crops, animals, people and foliage. In this instance, using a 3-stop solid ND has helped imply the feeling of motion by creatively blurring the swaying, summer crops.

Intentionally blurring subject movement, in order to create the impression of motion, can prove a powerful visual tool; so solid ND filters are popular for their huge creative potential. They are particularly popular for blurring moving water – water adopts a milky, ethereal look when recorded using longer shutter speeds. ND’s can also be useful for blurring the movement of moving cloud, swaying crops and foliage. Implied motion can add interest, depth and energy to your images. However, when using longer exposures, a good sturdy tripod is essential to ensure your photographs remain sharp and ‘shake’ free.
Although ND filters effect exposure length, your camera’s TTL metering will automatically adjust exposure time to compensate for the filter’s density once attached.

Extreme Neutral Density filters:
More recently, ‘extreme’ ND filters have become popular among landscape photographers. There are a number of extreme ND’s available, raging from 6- to 13-stops. The most popular is Lee Filters ‘Big Stopper’, which has a density of 10-stops. By using one, you are effectively doubling exposure length 10x, so their effect is far more pronounced than a ‘normal’ ND. It is can be possible to generate exposure lengths of up to several minutes using one. For example, by reducing exposure by 10-stops, an existing, unfiltered shutter speed of 1/8sec is lengthened to 2minutes. During this shutter length, a lot can alter – drifting cloud is transformed into brushstrokes of colour; moving water is rendered smooth and glass like; and moving people or traffic will ‘vanish’. This is a highly creative filter type; using one can give your images atmosphere and mood.

>
The density of extreme ND’s is so great, that you can hardly see through them. Therefore, composition, focusing, and any other filtration required, needs to done before attaching the filter. Alternatively, LiveView can prove a great aid when using extreme ND filters, often giving a clear enough image on the monitor to allow photographers to tweak composition and align ND grads without having to remove the filter. However, on some models, LiveView isn’t sensitive enough to be of any help. Therefore, try LiveView on your camera with the filter in place to see if it will work or not.
Extreme ND filters are often referred to as ‘grey day’ filters. They work particular well in constant, overcast light when photographing subjects with strong, bold shapes – for example, a pier, lighthouse, groyne or windmill. Even in grey weather, the length of exposure will transform a textured sky, helping create an arty masterpiece, which suits conversion to black and white.
Due to the filter’s density, a camera’s metering will normally struggle to select the correct exposure automatically, while exposure length will often exceed the camera’s slowest shutter speed – typically 30seconds. Therefore, you will often need to do a little basic arithmetic when using extreme ND filters, and employ the camera’s Bulb mode in order to keep the shutter open manually.

Long exposure
You either love or hate the ‘blurry water’ effect. Most photographers love it and the impression of motion can prove a very powerful visual and compositional tool. These two images of the same scene help illustrate the difference filtration can have on your landscape photographs.
So how do you calculate correct exposure? The best option is to take a meter reading without the filter attached and then increase exposure time by the filter’s factor. For example, if the unfiltered exposure time is 1/15sec, with a 10-stop filter attached is will be 1-minute – 1-stop is 1/8sec; 2-stops is 1/4sec; 3-stops is 1/2sec, and so on. However, rather than working this out manually, it is easier to use a chart or – if you have a smartphone – download an Application, like NDCalc, which will do the hard work for you.
Although extreme ND’s are still meant to be ‘neutral’, almost all have a colour cast of some type. However, this can usually be corrected easily during post processing. During such long exposures, light leakage can prove a problem – resulting in ugly flare, or strips of light on the final image. To minimize the risk, always place slot-in filters in the filter slot closest to the lens and also keep the camera’s eye-piece covered during exposure.


