

The humble flashgun can open up a huge world of creative possibilities, if you work out how and when to use it properly. From mimicking beautiful natural light to providing dramatic, hard-edged and colourful results, using your flash off-camera can give some amazing results. And once you start to use more than one flash off camera, then you are in complete control of your lighting and can create unusual, beautiful and dramatic photos that you just can’t get any other way. And it’s not too difficult to do.
Once you start with a single off-camera flash, then introducing more flashes with different modifiers lets you build up a photos step by step to get something truly unique. But of course, you have to start with the basics. And if you already own a modern pro-consumer DSLR from one of the big brands and its dedicated flashgun, there’s a chance you already have everything you need to take it off camera and work wirelessly so it can work everything out automatically.
Essentially, you set the camera to “Master” via a mode that’s usually within the menu system. Alternatively, you can usually use a compatible speedlight on the hotshoe and set that to be the Master.
By navigating the menu system on the camera or controller, you can set up different flashguns as different groups, and adjust the relative power or exposure compensation by dialing it in. You don’t have to keep on walking back and forth to change settings on the flash itself.
But there is a huge issue, and that’s the camera using an infra red signal to control everything. That means there must be a direct line of sight between the master and slave, and the range is limited. If you want as close to 100% reliability so that your flashes are guaranteed to fire every time you push the shutter, radio triggers are by far the best option.
Some work as an automatic TTL system but most are just a basic trigger. This means you have to set your flashgun manually for both power and zoom setting, and to change it have to keep walking up to it then back to your shooting position.
Many photographers initially feel nervous about taking their flashes off automatic and taking full manual control. But once you get used to it and experienced in how your flashes work, it’s easy.
There are really only two things you can change on most flashes, and that’s the light output (or power) plus the angle of the beam.
Most modern flashguns let you manually dial in how much power you require. From full power – often labeled as 1/1 – through half power (1/2), quarter power (1/4), eight power (1/8) right down to 1/128th power in many cases. This reducing by half every time tallies with camera f-stop numbers, where f11 lets in half the amount of light as f/8, which lets in half as much as f/5.6 and so on.
Many flashes offer greater adjustment, in thirds of a stop power level. So you can go up from ¼ power to ¼ and a third of a stop, then 1/4 and two thirds of a stop until you finally reach half power.
It’s not rocket science. It’s best to set your camera’s exposure manually for the ambient light, then if your photo needs more light from the flash, just adjust the power up a little at a time until it’s right.
Of course, working manually means you’ve got to keep walking back and forth between your camera and flash to make the adjustments. But with more experience, you’ll be able to make an educated guess at what the power level should be. Then tweak away, but it’s unlikely you’ll need to adjust more than a couple of times if your first guess was pretty close.
And with experience, especially if you’re using several flashes and they are all over or under-exposing, you can often just adjust the camera’s aperture. This affects depth of field and ambient exposure, but that may or not be a problem depending on the individual situation. If the flashes are too bright or dim relative to each other, then you have no other option but to change one or more flash output settings.
The real key to successful flash photography is all about carefully balancing the output of the flash with the existing ambient light. And by ambient light, this doesn’t necessarily mean natural light outdoors, although it obviously can.
Streetlights, interior lights inside buildings, the light from a TV or even candles are all ambient light sources.
This balance between flash and ambient is not only about intensity but also about colour temperature, too. Cool colours in the shade or at night, mixed with the warm glow of tungsten household bulbs are a world apart. And when you mix in a burst of flash that’s usually slightly cooler than daylight, you really have to think about what you want your final image to look like.
But in all cases, it’s the intensity of your flash that really matters. You can use flash as a fill light, to reduce contrast in a scene that’s predominantly lit by daylight by filling in the shadows. It can be subtle, to the point where it’s hard to tell a flash has been used at all.
At the other end of the scale, you may wish your flash to totally overpower the ambient light in a scene. You can, if you have enough flash power and low ambient, rely completely on the flash output to light the subject. This means the ambient light has virtually no affect on the overall photo as it’s overpowered by the flash or flashes.
It’s often good practice to work out which you want your main light to be, and go from there. Usually, the ambient light is the one over-riding factor as you often can’t affect it.
You control how this ambient registers on the final image by using your aperture and shutter speed. Change one or both and the image changes. How you want this ambient to register is the key factor in your exposure. Whether you want the ambient and background to be underexposed and moody, for example. Or to be the main light source.
You then introduce your flash which is a very fast light source. So fast, that altering your shutter speed doesn’t affect the brightness of the flash on the final image. That’s because the shutter is open for a longer time than the flash unit which is a tiny blip of intense light. To affect the intensity of the flash on the final exposure, you can alter its power or your camera’s aperture.
A good way to think of it is that shutter speed affects the ambient light, while aperture affects both ambient and flash. If you close down your aperture by a stop, for example, the ambient light and flash light exposures are both underexposed, too. If you went to a fast shutter speed – as long as it was within your camera’s sync speed – then only the ambient is affected.
Once you get to grips with this relationship, balancing flash becomes second nature.
When you have mastered balancing flash with ambient light, then it’s easy to start to build up a picture using more than one flash. These can be used to pick out parts of the scene that would normally be in shadow or be darker than you’d like. By altering the effect of the ambient exposure by using your ISO, shutter speed and aperture, you can change the overall look of the scene. Then introducing one flash at a time – with a variety of different modifiers, power settings, zoom positions and color temperatures using gels – you can highlight the important areas or leave parts to stay unlit.
The key is to build up the exposure one light at a time, so that you can see the effect of the changes. And as the light from the flash is likely to bounce around the scene, it will affect how other parts of the image appear, too.
The key is setting the ambient first, to get the base exposure how you’d like it. Typically this is to underexpose slightly by around a stop or more, so that the effect of your lighting is noticeable.
Then start to build up the scene with your flashes, ideally starting with your main light first.
A good technique can be to use cross-lighting. A soft light on the subject, and a harder light from behind to separate them out from the background. It’s a great starting point that often works, especially on portraits.
Always carefully look around the scene and see which parts, if any, need picking out with light. This could be an overall increase in light levels, so a softbox or umbrella could be used. Or whether you want small pools of light from a flash with a grid or honeycomb. This can work very effectively with colored gels, as these pools of light can be pools of bright color.
And don’t forget hiding small flashguns, too, in places that you couldn’t put a bigger light. Inside the footwell of a car, for example, or on a bookshelf behind a subject’s head. Use the advantages of small flashguns to put little bits of light where they can create a bit of three-dimensionality or pools of interest.
The only limit is how many flashes you can lay your hands on!
Stick to manual and you’ll see the changes you make on your LCD screen. And of course, if you’re setting up multiple lights then you can’t try to cut corners and do things in a rush anyway.
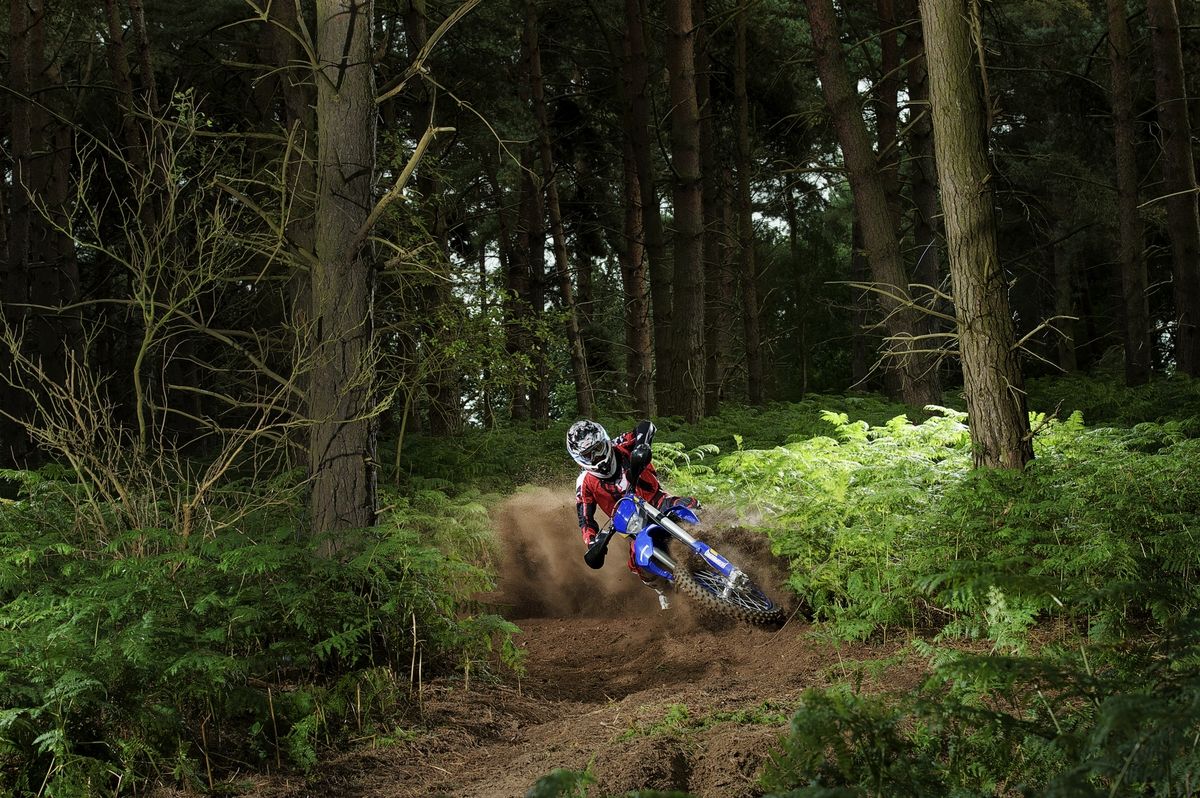
Four small flashes were hidden around this wood to create a dramatic pool of light where the motorcyclist was going to be. One is hidden behind the tree trunk to the right to provide some rim light for the subject and another behind the tree to the left to light the dust he was going to kick up. The main light on the subject comes from a flash to the right of the camera, and another flash out of frame to the left subtly lights up the bush.

Four flashes, all with honeycomb grids to control the spill of light, were positioned around the footballer to make a focused pool of hard-edged light in the centre. Two were slightly ahead of him, and two behind him (out of frame to the left and right) to give a hard edge of light.

The sun provides the lovely rim lighting and flare on this shot in a woods, but that means the subject’s face was in shadow. However, the effect was not strong enough so a flash was out of frame to the left of camera and aimed towards the camera to provide even more flare and more light on the rear of the subject. It mimics what’s naturally there, but just increases its effect. A flash, fitted with a softbox for more flattering light, was out of frame to the right of the camera to provide illumination for his face.

A dark quarry at twilight, a smoke bomb, a motorbike in action and some coloured gels make for this dramatic shot. The main light on the bike was from two flashes, fitted with honeycomb grids to make two pencil beams of light. They were each side of the subject and aimed towards where the rider would be.
Directly behind the bike, fitted with a red gel, was another flash aimed back towards the camera. A fourth flash, fitted with a blue gel, was high up and to the left and aimed just to light up the plume of smoke from the smoke bomb.

A mixture of flashes in softboxes for soft light and flashes running bare for a harder edged shadow lit this rugby team in their training changing room. Two flashes with softboxes next to each other and a single bare flash were to the right of the camera and up high to mimic the light coming in from a large window. But these light put the faces of the player on the right of the scene in shadow, so a second softbox was used to the left of the camera to reduce the contrast on him. A bare flash was aimed at the ceiling of the room to lift the ambient light level and reduce the overall contrast.

Making flashes look natural can be a challenge, but if you look at the quality and direction of the light that’s there then use flash to supplement it, it can look real. Two softboxes were used to the right of the camera, one high and one low and facing towards the subject, to boost up the ambient light in the room. A third softbox was to the left of the camera to light up the dark area under the table.

The light from the sun provided a dramatic rim of light and shadow to this subject, but of course left his face in darkness. Two flashes were used, fitted to lightstands with small beauty dish-type attachments with honeycomb grids to stop them spilling too much. The first, out of frame to the left of the camera, lights up the subject’s face. The second, out of frame to the right of camera, puts a little kick of light on the side of the subject’s head.

A dingy corner of a room was made to look much brighter thanks to off-camera flashes. The main light on the subject’s face was a flash fired through a softbox to the right of the camera. A second flash was fired directly up into the ceiling to lift the whole level of ambient light and reduce the contrast on the subject’s face.


