

In the “Horsing Around with Virtual Reality Part 1,” I attached my Nikon KeyMission 360 camera to my horse’s harness, which failed due to the amount of nauseating motion. Though it was my first attempt at 360 video recording, it was a rookie mistake. Oh well. Failures are a part of learning. The only thing for me to do was go back to the drawing board and try again.
For the second attempt, I made sure to bring my Manfrotto Safety Cable, so I didn’t have to use a bucket strap. And despite the disappointments of the first video, I did feel the support system I used made up of the Manfrotto 143A Magic Arm, Super Clamp and XPRO Ball Head for the Nikon KeyMission 360 worked well. For that reason, I wanted to use it again – this time in different locations on the wagon.


In order to preview the Nikon KeyMission 360 camera’s perspective, I synced my camera to my smartphone via Bluetooth so I could use the Nikon SnapBridge application. I attached the camera to the wagon’s buckboard for the first sequence and launched the app on my smart phone. Then I used the Live View Mode of the Nikon SnapBridge application to make adjustments to my composition. Instead of physically pressing the on/off button on the camera, I initiated recording directly from my phone via the app – pretty nifty.


Once I started recording, I pocketed my phone and took up the driving lines. I steered my horse and wagon down the lane and through a backfield. After adequate recording time, I parked my horse under the shade of a large oak tree and repositioned the camera.
I rotated the Manfrotto 143A Magic Arm downward so the front lens, which happens to be the side of the camera with the Nikon logo, would capture my horse’s legs and hoofs while the back lens, which is marked with “NIKKOR,” recorded me while I drove the wagon. Again, I used my smartphone and the Nikon SnapBridge application to review my camera settings and composition then started recording.

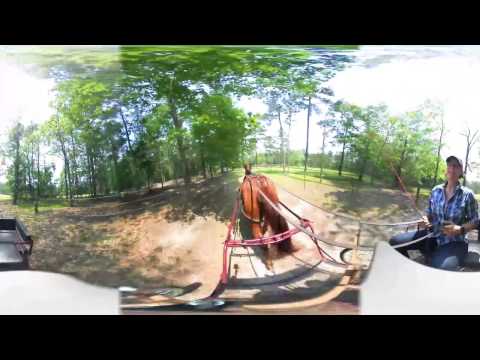
After a brief time of driving, I stopped my horse to reposition the camera. This time, I attached the Manfrotto 143A Magic Arm and Super Clamp to the left-side wagon shaft that runs the length of my horse’s body. For the safety of my horse, and security of my camera, I looped the Manfrotto Safety Cable through the driving line eyelet located on the harness saddle. If any part of the support system failed, the equipment would not become entangled in my horse’s legs or be trampled and destroyed.
I positioned the front lens toward my horse’s head and the rear lens toward me in the driver’s seat. While in Live View Mode in the Nikon SnapBridge application, I used the XPRO Ball Head to angle and level the camera, and again began recording.


I drove my horse to the end of the lane and back then stopped in order to reposition the camera for one last shot. This time, I attached the support system to the side of the wagon located just behind the driver’s bench. I implemented the same techniques to adjust and compose my shot and started the recording one last time.
This time, I picked up some friends to bring along for the ride. They brought their dog, Paxton, too.


We took our last trip down the lane to complete the shoot. When we stopped for the last time, I felt a sense of achievement. That’s not to say every bit of my shoot was a resounding success. I simply felt more confident in my ability to capture 360-video.
The biggest lesson learned during my second attempt at 360-video was the video stitching and lens perspective. First, there’s a faintly distinctive line where the front and back lens meets. If you’ve got any straight lines that pass through the front and back lens stitch seem, it may become distorted.
Secondly, you can see the camera’s support system in the frame. It would be ideal to not see the Manfrotto 143A Magic Arm and Super Clamp. The solution would be to keep the camera as close to the support object as possible, thus reducing it’s profile. This would require terminating the use of the Manfrotto 143A Magic Arm altogether and placing the Nikon KeyMission 360 camera directly to the XPRO Ball Head and Super Clamp.
If you look closely, in every frame you can see the quick release plate toggle. It appears as a large grey/black mass in the bottom right and left sides of the frame. With that in mind, I’d eliminate the use of the XPRO Ball Head too and just use the Super Clamp with standard stud to attach the camera. Again, these are my “lessons learned.”
Without further ado, here’s the video.
So, how did I edit all the video files together and post the final product to YouTube? Let me give you the quick run-down.
In order to ingest the video files, I could have used Nikon’s proprietary KeyMission 360 Utility Software to view and download the files. However, I went the more expeditious route by using the micro SD card adapter to insert into my MacBook Air’s SD card slot and downloaded the video files directly to my desktop in a neatly organized folder titled, “170423-SLP-KeyMission.” From there, I processed the MP4 files in Adobe Premiere Pro CC because it has 360 video editing and export capabilities.

The Adobe Premiere Pro CC allows you to view all your raw capture video footage. You can make markers of the footage you like then cut and splice them into one timeline. You can also tell Adobe Premiere Pro CC that the footage you’re viewing is 360-video. So instead of seeing the entire 360-degree view in one frame, you can view it from the vantage point of the “front lens.”

The Adobe Premiere Pro CC allows you to view all your raw video footage. You can make markers of the footage you like, then cut and splice them into one timeline. You can also tell Adobe Premiere Pro CC that the footage you’re viewing is 360-video. So instead of seeing the entire 360-degree view in one frame, you can view it from the vantage point of the “front lens” and use your mouse to move the point-of-view.
What’s more, Adobe Premiere Pro CC allows you to adjust brightness, contrast and add various effects and filters. You can create intros, caption slides, credits and more.


When you’re done editing, you can export your video in a variety of video file formats. For my purposes, I exported it as an MP4 for YouTube. By the way if you go to YouTube, they’ve got links to pages explaining how to upload your 360-video. In order to maintain the 360-video, virtual reality capabilities, you must download their provided program to inject special media metadata into your video.


Once you’ve uploaded to YouTube, you can title your video, add key wording, make it private or public and share it from there. While YouTube offers users the ability to edit their videos on their webpage, it disables the 360-viewing ability. That’s another reason to use a video editing software ahead of time then post to YouTube.

Let’s face it I’m no Corey Rich. But after taking on the 360-video challenge, I feel secure in my ability to piece together a fun, creative virtual reality experience. I’ll be trying my hand at more of these in the future.
(For all you animal lovers, don’t worry. I only use the driving whip to tap the wagon so my horse has an audible cue to walk. I do not touch my horse with it.)