

For many photographers the wedding is the easy part of the wedding photography business. The editing, finishing and image correction taking up too much time, so in this article I explain step by step workflow from wedding to proofing.
I know we all have our own ways of doing things and I am not trying to convert you to my way of doing it, I am just giving you a chance to see perhaps an alternative workflow.
No two weddings are the same, no two locations are the same and no two weather conditions will be the same, especially in sunny South Wales, here in the UK. This means that images are going to have a slight inconsistency at times, however it is my job on the day to make sure I don’t make extra works for myself by getting it wrong in camera. This is why I opt to shoot in a completely manual mode on camera with the exception of focusing of course. The only thing I use in an automatic way is my speedlite, whether on camera or off and this is when the technique starts to fall down a little, when the flash thinks it knows better than me I mean.
So a general edit of say 1000 images to 600 will take around 90 minutes. This includes card download, edit, rename, metadata, key wording, RAW exposure and colour correction, not forgetting backup to cloud and proofing online.
I use Adobe Bridge and Adobe Camera RAW for all my editing, but whatever software you use I am sure you will be able to follow my techniques. Bridge and Adobe Camera Raw is a part of Photoshop and of the Adobe suite etc. Bridge is a basic file manager and even though it is not as powerful as Adobe Lightroom in image searching and data management, I find it slightly quicker in my wedding workflow.
1 – Download
I download each card, one at a time and as soon as card 1 is fully downloaded and card two has begun, I start editing card 1. By doing this I am not waiting for files before edit even though they are separated into different folders.
2 – Separation
Before the edit is separation of the RAW files from the Jpeg’s as I shoot both on camera. As soon as the jpegs are separated to a new folder and drive they are uploaded off site to my cloud storage vault with SmugMug.

3 – Edit
I use the slide show facility within bridge for a full screen image to make my selection easier as I am concentrating on the face, expression, eyes open as well the storytelling and details. It is important for me to do a hard edit from the start, so I go on instinct and experience. If I leave too many images in I will need to do a second even a third edit which adds to the time in workflow.
I simply use the numeric key 6 to add a RED Tag to the images I want to lose, this is because I am selecting more images to keep than to delete, hence labelling only the images to delete. Use the forward and back arrows to advance the images back and forth as well as remembering to switch off any dissolves in the slide show options.
Once I have done my first edit I select the Red Labelled images and delete them fully from my system, remembering that I still have a jpeg of everything already stored off site, which can be downloaded with a click of a mouse. I know that this sounds extreme but there is no need for me to keep the RAW files that I don’t want a client to see.
(If you are in doubt process the files to delete to a JPEG before deleting, that is what I used to do years ago)
I would follow this pattern through the rest of the editing. Start downloading another card, start edit on the card just downloaded. By doing it in this way the computer is always waiting for me instead of the other way around.

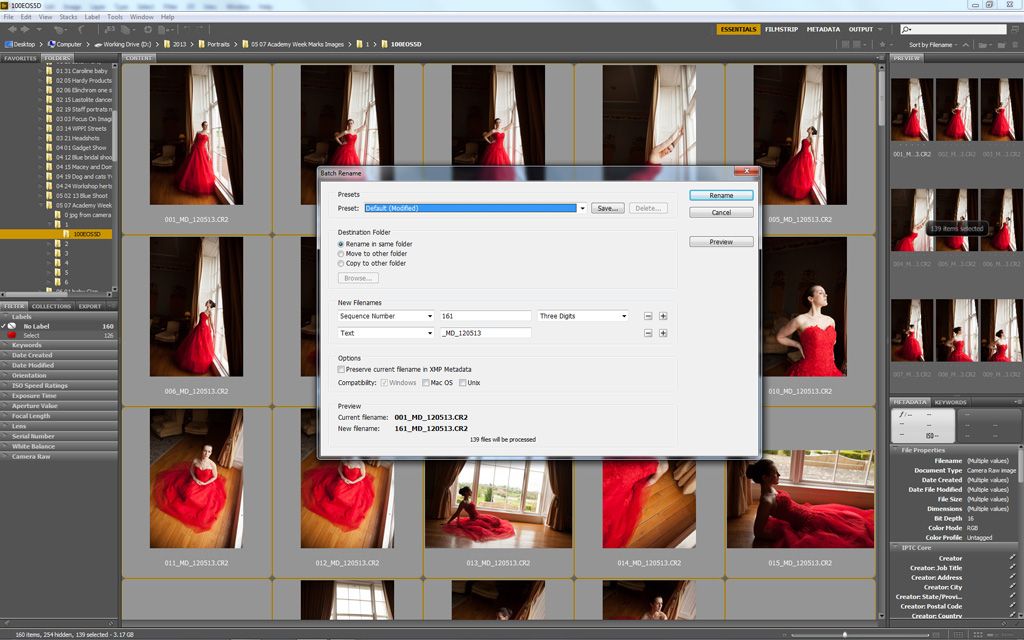
4 – Rename
After I have edited all the images I move them all into one folder, I then do a final check for duplication of images and deleting any additional images I decide not to show the client.
The last stage is reorganising them, I do this quickly by using the Sort by date created, I do this as I use multiple cameras during the wedding and this slots images into two time zones. A final re organisation if I want specific images be placed before or after I have taken them such as details.
Using – Tools – Batch Rename to give all the files a new name in a numeric 3 digit order with a unique code following for ease of identification. Usually an underscore then the Bride and Grooms initials followed by an underscore along with the wedding date Month/Date/Year.
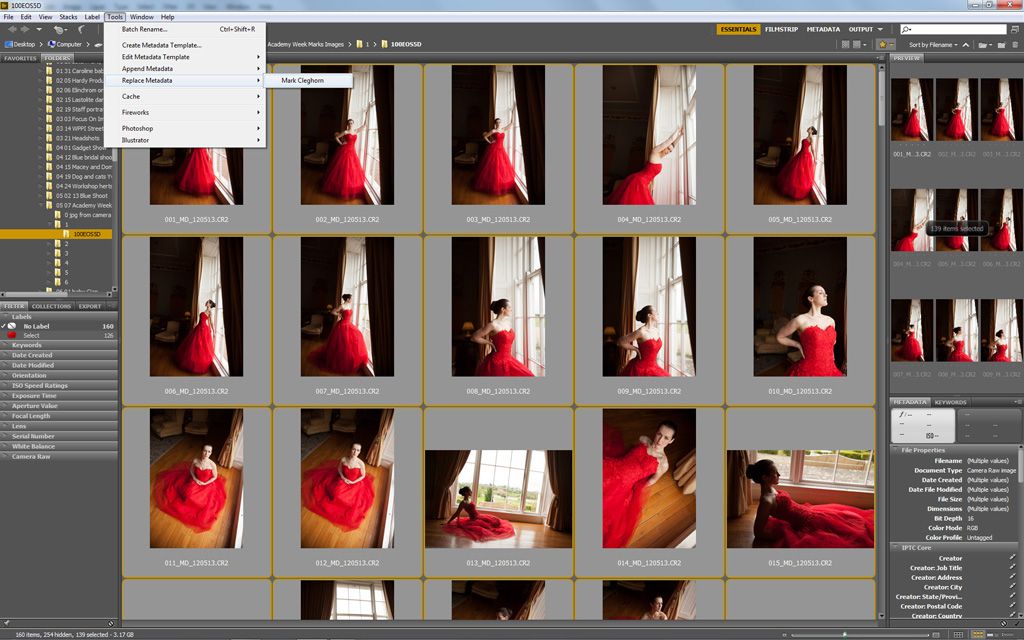
5 – Metadata
A quick click of the replace Meta Data button under Tools puts my premade details on every file before they are processed to help protect them in usage. At this stage if there are any images that I want to add to my wedding portfolio I add a code of MCWED13 in their keywords as my SmugMug website has smart galleries to look for any new files being uploaded to any folder with special keywords. This keeps my portfolio up to date without any extra work.
6 – Selection of black & white
The next stage is to choose the images to be shown in Black & White, I do this in the light box mode as you can see here by Ctrl Clicking images to add into my selection, when finished I press the Numeric 9 key to add a blue label to the selection.

7 – Basic correction
At this stage I can bring all of the images into the Adobe camera Raw Process module via bridge File – Open in Camera RAW
The similar images are then selected and corrected on mass as you can see here. Correction usually takes the form of a slight change in exposure and a slight adjustment of the Highlights. Even though you are seeing here the basic adjustment panels I usually work with my pre-sets I have set up for slight tweaking of images.

8 – Correction and Refinement
Whilst I am doing the Basic corrections I am also refining and finishing any images that need a bit more help, like straightening and effects like graduations and vignettes…

9 – Mono selection
Even though I have been into the process ACR window I don’t save straight away. Instead I come back out to bridge hitting Done on the exit to save my changes to the RAW file. Once I am back in Bridge I select the Blue label images in the filter option and then bring just these into ACR. Once in ACR they are first saved to a new folder called mono in Colour and whilst they are processing I can then convert them to a black and white with a Pre-set before saving them again to the main Bride and Groom Jpeg folder. I do this as I want the couple to see the images presented to them as I see them but have the image still in colour within a sub folder to quickly get the image if it is required in colour.
My Black and White Pre-sets are a combination Mainly HSL reduction in colour under saturation with the added option of more black and contrast applied.


10 – Colour process and save
Once the Black and White images have begun to save I can exit back to bridge, select all the colour files, take them back into ACR and simply save them all as the corrections and adjustments have already been done.
As you can see in this image I am not renaming the files just saving the RAW file from a RAW to a New Jpeg file and in a separate drive for usage and also a form of backup in case a drive should fail.

11 – Online proofing
The final stage is to soft proof the images to my client online. I use SmugMug for my online Sales and Storage as well as my Portrait and Wedding Client website. A yearly fee allows me to store as many JPEG files as I want, as well having an excellent looking site that I can change as often as I want without additional charges as I can do it all my self.
The clients then use an agreed password to access the gallery to view, select and purchase the wedding images.


